Pi-Star C4FM
28/01/22 06:08
These step-by-step instructions assume that you all ready have a radio programmed for the hotspot frequency. This will only detail configuration of a simple hotspot and will not go into how to create a hotspot or image a MicroSD.
Requirements:
DMR ID (acquired at radioid.net and good to have on digital modes)
Imaged Pi-Star MicroSD (get image at pistar.uk and belenaEtcher to image with)
RaspberryPi Hotspot (BYO or buy ready made TGIFSPOT.com)
Optional:
MicroUSB to Ethernet adapter (Amazon)
This option is to allow you to connect your hotspot directly to your network via Ethernet.
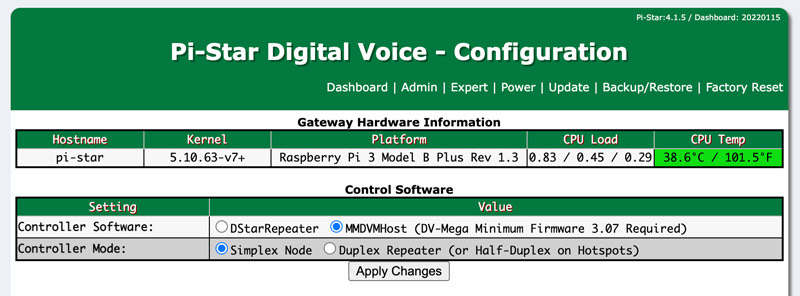
Control Software
- Select MMDVMHost (DV-Mega Minimum Firmware 3.07 Required)
- Select Simplex Node (unless you are running a duplex MMDVM hat)
- Click or tap Apply Changes.

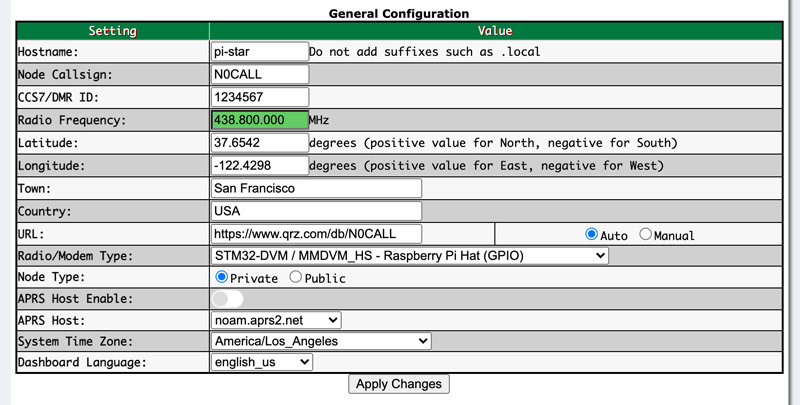
General Configuration
Only change the following
- Leave Hostname as is
- Enter your callsign in the Node Callsign field (just your callsign and no extensions).
- Enter your DMR ID in the DMR ID field (acquired at radioid.net).
- Enter your desired frequency in Radio Frequency.
- Place your QTH latitude in Latitude.
- Place your QTH longitude in Longitude.
- Place your town in Town.
- Place your country in Country.
- Leave URL alone unless you have a website address.
- Select your MMDVM type in Radio/Modem Type.
- Choose Private in Node Type (hotspot will only respond to your a radio with your DMR ID).
- Select your time zone in System Time Zone.
- Select english_us in Dashboard Language.
- Click or tap Apply Changes.
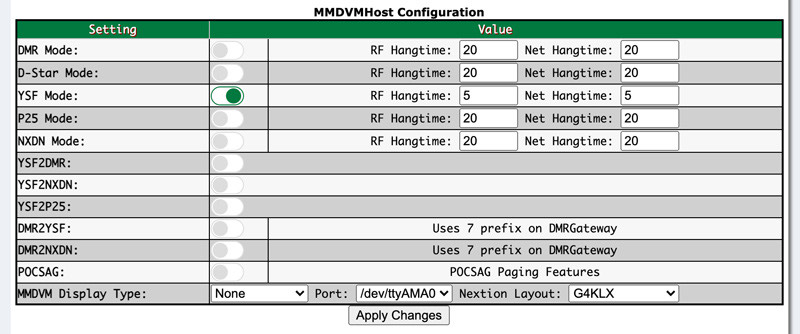
MMDVMHost Configuration
- Select YSF Mode
- Set RF Hangtime and Net Hangtime to 10 or not less than 5
- Click or tap Apply Changes.
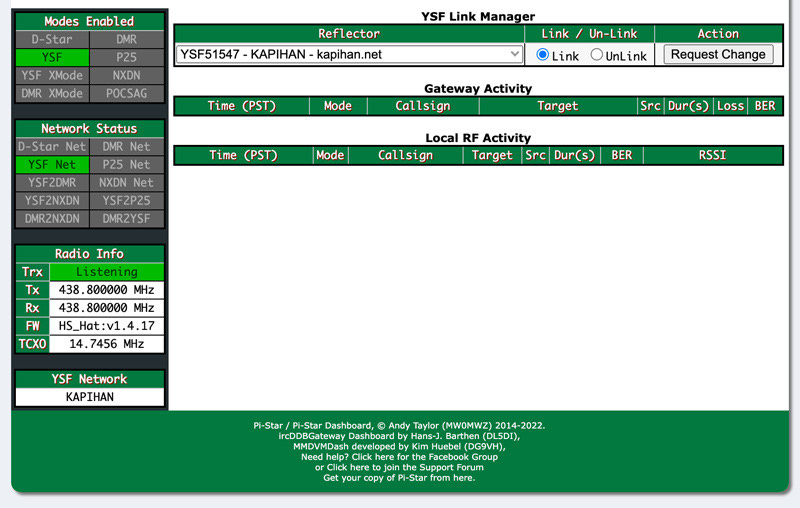
Yaesu System Fusion Configuration - YSF Reflector
- Select a master in YSF51547 - KAPIHAN - kapihan.net in the drop down YSF Startup Host.
- Leave UPPERCASE Hostfiles as it is.
- Click or tap Apply Changes.

Yaesu System Fusion Configuration - FCS Reflector
- Select a master in FCS00347 - Kapihan in the drop down YSF Startup Host.
- Leave UPPERCASE Hostfiles as it is.
- Click or tap Apply Changes.

Yaesu System Fusion Configuration - XLX Reflector
- Select a master in YSF93887 -XLX547 - XLXreflector in the drop down YSF Startup Host.
- Leave UPPERCASE Hostfiles as it is.
- Click or tap Apply Changes.

Check Connection to Reflector
- You can do this by hitting Admin up at the top of the page.
- Mid-way down and to the left, you should see YSF and YSF Net both should be green.
- Since the writing of this guide, there's a bug that says YSF Network is "Not Linked". At this point key up and have a test QSO.


CONGRATULATIONS!
If all went well, you should now be connected to the KAPIHAN Network. Feel free to modulate and hope to talk to you soon! 7-3
Set up your Pi-Star for P25 >